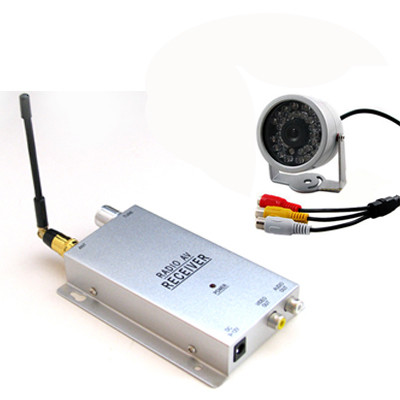
Tema: Parduodu CCTV wireless.Vilnius
Data: 2010-01-02 20:15:28
Sveiki,
parduodu CCTV. Naudota keleta kartu. Veikia be problemu. naktinis
apsvietimas galima pajungti laidais arba  be ju. Naudojau pajungta
laidais. Vaizdo kokybe  tikrai gera. Naudojant wireless rezimu vaizdo
kokybe prastesne.


Kameros aprasymas

eatures

Brand New 4 Channels 2.4G Metal Colour Wireless High Sensitivity Waterproof
Infrared Night Vision Camera and Receiver
Dimension: 55mm X 40mm X 40mm
2.4G Camera is stronger singal and better picture quality than 1.2G, and
one receiver can work with 4 cameras which in different channles,simply
just switch the channles to view different cameras, and if you used our
2 or 4 wireless camera sets, we will send you different channel camera,
unlike 1.2 G cameras and receivers, there will not be conflicts in
frenquency.Up to 200M ( 660ft) transmission range with open area.
You can hide it anywhere. this model features a specially coated glass
2mm diameter pinhole lense, The optical coating reduces lense flare and
colour aberration found with cheaper lenses,The tiny 2mm size means that
you can make a spy hole just about anywhere you can imagine!
Fuctions inclues:Visitor Identifying,Home Security, Moving
Detection,Entry Detection,Baby and Patient Tending.
Wireless transmission and reception.
Send and Receive pictures through walls with high resolution.
Small and Light Weight.
Lower Power Consumption.
High Sensitivity.
Easy 1-Minute Installation.
Easy to Operate.
Audio and vedio recording.

Spcifications:
Frequency: 2.4.G
Resolution :380TV Lines
Linear Transmission Distance :50M (20 metres through obstacles)
Weatherproof:Yes
Minimum Illumination :0 LUX
Infra Red LEDs: 30
Night Vision Range: 15 metres (Total Darkness)
Camera Lens:6mm
Viewing Angle;56 degrees
Camera Size :40mm Diameter(better than 45mm)
Dimensions:5.5cm x 4.0cm x 4.0cm
Image pickup device : 1/4" Image Sensors
Effective Pixel :PAL : 628X582
TV system :PAL / CCIR
Transmission Signal :Video
Output Power :50mW

User Instruction:
1. Twist the receive antenna into the receiver
2. Connect the receiver to the monitor (TV, Video, PC) with AV cable
3. Plug the DC 12V 500mA adaptor into the power jack of the receiver
4. Insert the second DC 9V 500mA adaptor or the 9V Battery (not
included) via the leads
into the power jack of camera
5. Adjust the frequency controller on the receiver to the required position
6. Adjust the lens of the camera to the best position, then mount the
camera.


Jei domina si reikalas parasykit email'a
rimas@crygod.com

3Dastronomyagricultureaudioautosautos.audiautos.audioautos.binariesautos.bmwautos.clubautos.fordautos.hondacrxautos.japanautos.mercedesautos.opelautos.sportautos.volvoautos.vwaviaavia.binariesbankcardsbinariesbooksbuildingcinemacommercecomp.hardwarecomp.softwarecomp.lietuvinimascomp.networksculturedarbas.ieskaudarbas.siulaudesigneconomicselectronicsfaunafauna.aquafauna.binariesfishingflorafotofoto.binariesgamesgames.csgames.onlinegsmgurmanaihumourhumour.binariesinternetlawmicrosoftmotomusicmusic.binariesmusic.instrumentsmusic.LT.binariesnavigacijaphppoliticsprogrammingrpgsportstudyingsveikatatalktesttranslationtransportationtraveltravel.binariestvunixvideovideo.binarieswatersportswwwwww.flashpdaautos.supermama.ltmobile